Monday, December 12, 2016

Gratitude as the Cure for Anxiety

By Janine L. Agoglia

The holiday season is a time of year when people tend to be in a better mood and are kinder to their fellow human. On the flip side of that, people also tend to be rushing around, preparing for the holidays, anxious that they won't get everything done. "I just need to make it to January" is often the mind set.

The problem with "just making it until..." is that you are not able to enjoy what is happening now. By constantly looking ahead, you are missing your current life. Anxiety lives in the future, so that type of thinking is often very stressful and uncomfortable. When you worry about things over which you have no control (like things that haven't happened yet and may or may not ever happen) it causes anxiety and stress. Focusing on something that you do have control over can help you feel more calm and in control of your body and mind.

Gratitude is a practice that can bring you into the present. There is a saying that says "Fear and Gratitude cannot occupy the same space." It is hard to be worried about all of the food you need to buy and prepare when you are grateful for the food that you have and the family members for whom you are preparing it.

If you find yourself getting stressed this holiday season (or at any time during the year), take a moment to close your eyes and breathe (please keep your eyes open if you are driving). Inhale through your nose filling the belly (not the chest) with air, and then exhale very slowly, allowing your belly to deflate again. Try to make the inhale and exhale of equal length, or the exhale slightly longer than the inahle. Repeat this 5 times. Then think of 3 things for which you are grateful. You can just think them to yourself, you can write them down, you can say them out loud, whatever works for you. Sit with those 3 things and really allow them into your heart and consciousness. You may also notice that your stress has dissipated.

Making Gratitude a daily practice can go a long way toward easing your anxiety and helping you enjoy the life you are living.

Happy Holidays!

Janine L. Agoglia has been teaching Vinyasa yoga since 1998. Her yoga journey started in 1995 with Iyengar Yoga and she discovered Vinyasa yoga in 1997. The combination of breath with proper body alignment is what fuels Janine's practice and the classes that she teaches. She believes that yoga should be safe as well as challenging, creative and fun. She always emphasizes proper alignment within the flow, as well as focus, breath and humor to help students find the balance between strength and ease. Deepening one’s physical awareness helps one strengthen his/her spiritual awareness and mind-body connection. Janine loves being able to help people deepen their own practices, finding yoga in everyday life, on and off the mat. Her DVD, “Vinyasa Yoga for Regular People” is available for purchase at the front desk at Lumina Mind Body Studios in Wayland, MA.

In addition to being the Co-Director of Yoga and teaching yoga classes at Lumina Mind Body Studios Janine is also a Licensed Acupuncturist and Chinese Herbalist who practices at Integrative Therapeutics in Natick, MA.

To contact Janine, please email acuyogamama@hotmail.com or visit her website, www.acuyogamama.com.

Wednesday, September 7, 2016

T'ai Chi: Grasp The Sparrow's Tail and the 4 Primary Jins

This article was originally published by Jon Woodward on www.metrowesttaichi.com and was reposted here by permission.

By Jon Woodward

In many styles of T'ai Chi there is a fascinating movement often called "Grasp The Sparrow's Tail." It might also be called "Grasp The Swallow's Tail" or "Grasp The Peacock's Tail" or simply "Grasp The Bird's Tail." This move is different than many other movements in T'ai Chi as it has four distinct parts that relate to some deeper aspects of T'ai Chi. These four parts are:

  • Ward Off
  • Roll Back
  • Press
  • Push 
Grasp The Sparrow's Tail is very common throughout most styles of T'ai Chi and is a movement that holds a lot of significance within T'ai Chi. Keep that thought-- we'll come back to it in a moment.

T'ai Chi is an internal martial art, meaning that instead of using our muscles to generate force, the thought is that we use a relaxed structure and "internal energy" to generate force. In T'ai Chi, the expression of this energy is broken up into eight categories, often called the "8 Jin" (or "8 Jing"). Within these 8 Jin, the first four are considered the so-called "primary" ones. These 4 Jin are:

  • Peng (pronounced "Pung")
  • Lu (pronounced "Leeu")
  • Ji (pronounced "Jee")
  • An (pronounced "Ahn")

In English, these are typically translated into:

  • Peng-- Ward Off
  • Lu-- Roll Back
  • Ji-- Press
  • An-- Push

Maybe you have noticed that the English translations are also the four parts of Grasp The Sparrow's Tail (how very astute of you). As you may have guessed, the four parts of this movement exemplify the expressions of energy in those four primary Jin.

However, the translations and the movements can be a little deceiving. So let's take a moment and go through each of these four Jin and try to figure out what they actually are doing.

Peng-- Ward Off
You may have noticed that I bolded this first one (again, very astute of you). That is because Peng is the basis for all the other Jins. Everything else derives from, or grows out of Peng.

Peng is an outward and expanding energy. It has a somewhat elastic or bouncy feel to it but is very substantial at the same time. You can imagine a balloon as having Peng energy. If you imagine pushing on the balloon that is against a firm surface, such as a wall, it would give a bit. But however hard you push, it is as if your push is getting returned right back to you-- as if your energy is being redirected back to you. A better translation of Peng might be "Boing." This is the feel of Peng.

When performing "Ward Off" within Grasp The Sparrow's Tail, we ideally want the warding off arm to expand outward and upward with the use of Peng. We want to strive for a feel of this arm moving as if there is a balloon sitting between our arm and body that is being inflated. As the balloon inflates, the arm floats outward and upward.

Lu--Roll Back
Lu is a feel of opening up a space. If you imagine that you have expanded a bubble of Peng around you, and that someone is pushing on that bubble, Lu would be an opening of space that they would then fall into. Lu uses a state of Peng to create that opening. Without the Peng, we could not create the opening.

We can also create different expressions of Lu. For instance, as an alternative to simply creating a void for someone to fall into, if someone were to push on our arm when we are in the Ward Off position, we could open up space (Lu) while maintaining a small amount of Peng. If done well, they would feel as if they were pushing on a soft balloon and would simply roll off the balloon.

When we perform the Roll Back part of Grasp The Sparrow's Tail, we want to open up a space within our Peng. If we imagine an opponent coming at us, we open up the space and allow them to come at us and then just softly redirect or "re-guide" their energy so that it flows past us instead of directly at us. We want to do this in a relaxed state without using force to guide or pull them. If done well, your opponent will not notice the redirection. It will feel to them as if they are following their natural path right at you, but you simply just vaporized. To them it feels as if they are pushing into nothingness.

Ji-- Press
Ji is a compressing or squeezing type of energy. It takes the expansiveness of Peng and compresses it to focus it. It takes the opponent's energy and redirects it right back at them in a very channelled and penetrative manner.

You can imagine it as squeezing through a small space between your opponent's arms to deliver a penetrating blow.

When we perform Press in our Grasp The Sparrow's Tail move, it is as if we are gathering up a whole bunch of Peng that we have built up, and then compressed that Peng into a focused point at our wrists. We then express that focused energy forward. 

An-- Push
Push is much less about actually pushing and much more about rooting and sinking and bringing your opponent's energy down into your root. Push is like a downward expression of Peng with some qualities of Lu. The downward expression of Peng is done effortlessly, and to your opponent it can feel as if they are falling into a hole.

If an opponent is coming at you, then you simply redirect their energy downward. When done well, this will result in the opponent losing their root and becoming off balance. From there you could execute a roll back and let them fall on by you, or you could turn their energy around and expand your Peng energy, thus uprooting them and throwing them backward.

When we perform Push in the Grasp The Sparrow's Tail move, we want to be very aware of the sinking of the elbows and hands as we withdraw. This is the part of the movement (as opposed to the actual pushing forward) that expresses the An quality of the move.

When we are practicing Grasp The Sparrow's Tail, it is helpful to know how these energy expressions relate to the different part of the movement. This gives us an opportunity to experience the movements while directing our internal energy, rather than simply moving our limbs around our body.

So as we can see, the four parts of Grasp The Sparrow's Tail relate very closely to the 4 Primary Jins. It is also interesting to note that on a more subtle level these 4 Jins can exist in every movement of T'ai Chi--especially in the Traditional Form (it might be a bit more difficult to find each of these in every move of the T'ai Chi for Balance program since these moves have been modified to focus on balance). This gives us the opportunity to be aware of the expression of energy and to look for it as we are moving through our form.

If you have not yet done this, give it a try. Choose a movement (it might be helpful to start with Grasp The Sparrow's Tail) and explore that movement to see if you can find how the energy is being expressed in it. On a deeper level, once you become accustomed to the energy, see if you can have the energy generating the movement, rather than the movement generating the energy.

Have Fun!

Jon Woodward is a certified T'ai Chi instructor who has been practicing T'ai Chi for over 30 years. He has been teaching classes in Metrowest for over 5 years.

Friday, July 22, 2016

Improving Balance as we Age: Working from the Ground, Up

By Janine L. Agoglia

As we age, balance becomes a bigger issue. Many falls occur because people lose their balance. In an aging body, a fall can lead to broken bones which are often slow to heal. To avoid this, it is really important to work on your balance preventatively. This will strengthen your legs and ankles giving you a more solid, steady gait. If you can stand on one foot, standing on two feet becomes that much easier!

The key to balance of any kind (whether upside down or right side up) is adaptability. The more you can adapt to subtle shifts in your weight and breath, the easier it is to hold and maintain your balance. When you are rigid, and trying to "hold on for dear life," you are much more likely to fall over. Yoga Sutra 2.46, written by the ancient yogi Patanjali, is "Sthira Sukham Asanam" which translates to Steady, Comfortable Seat. Every yoga pose should feel strong and steady, while simultaneously feeling comfortable and relaxed. It is finding that equilibrium between stability and ease that creates balance.


Mountain Pose
Start with your foundation by finding stability on two feet. For more information about that, read about Mountain Pose (Tadasana) in Reducing Anxiety by Becoming a Mountain. Just practicing Tadasana/Mountain Pose daily can help you to develop your awareness of where you hold your weight on your feet. It builds your strength and stability from the ground, up. Start by holding the pose for 5-10 breaths, working your way up to 20 breaths. The goal is to be fully present on your feet, engaging the muscles to hold you up while also feeling a sense of relaxation and ease through the entire 5-20 breaths.

Once that is comfortable, you can begin practicing one-legged balance poses, such as Tree Pose (Vrksasana).

Variation #1
Variation #2
Start by standing in Mountain Pose and shift most of your weight onto your right foot so that you can raise your left heel off the floor (ball of the foot is still on the ground). Keep the basic alignment of Mountain (stacking the hip over the knee over the ankle), pressing the right foot strongly into the floor while engaging your right thigh and buttock and your lower abdominal muscles. Once that feels stable, try floating your left foot off the floor, raising your left knee toward your chest. Once that feels stable, place your left foot somewhere on the inner right leg (above or below the knee) and move your left knee as far to the left as you can while keeping the pelvis aiming forward. Your knee will end up on a diagonal, it will
Variation #3
never be flat to the side; if it is flat to the side that means you have shifted your pelvis which will throw off the alignment of your standing
leg. You can place your hands on your hips (Variation #1), you can bring your palms together in front of your heart (Variation #2, Anjali Mudra) or for more of a challenge you can raise your arms above your head, providing that you keep your
shoulders down (Variation #3). Hold Tree Pose as long as you can, remembering to stay relaxed, both in body and mind. Keep breathing in and out evenly through your nose. When one side is tired, try it on the other leg. You may notice that balance is much easier on one side that it is on the other; this is completely normal. We don't lead symmetrical lives so it is common for one side to be stronger than the other. Over time, with practice, this should even out.

Falling over is also normal. Balance is found by falling over a lot first. What is most important is how you relate to the falling over. If you are harsh or critical with yourself, you will create more tension in your body and make it that much harder to find your balance. If instead you say only kind and supportive things to yourself, it is much easier to maintain that sense of ease.

Try making balance part of your daily life, any time you find yourself standing. Try washing the dishes, talking on the phone or brushing your teeth while standing on one leg (it doesn't need to be Tree Pose, but it can be). The more you practice, the easier it gets and more quickly you will see improvement.

Janine L. Agoglia has been teaching Vinyasa yoga since 1998. Her yoga journey started in 1995 with Iyengar Yoga and she discovered Vinyasa yoga in 1997. The combination of breath with proper body alignment is what fuels Janine's practice and the classes that she teaches. She believes that yoga should be safe as well as challenging, creative and fun. She always emphasizes proper alignment within the flow, as well as focus, breath and humor to help students find the balance between strength and ease. Deepening one’s physical awareness helps one strengthen his/her spiritual awareness and mind-body connection. Janine loves being able to help people deepen their own practices, finding yoga in everyday life, on and off the mat. Her DVD, “Vinyasa Yoga for Regular People” is available for purchase at the front desk at Lumina Mind Body Studios in Wayland, MA.

In addition to being the Director of Yoga and teaching yoga classes at Lumina Mind Body Studios, Janine is also a Licensed Acupuncturist and Chinese Herbalist who practices at Integrative Therapeutics in Natick, MA.

To contact Janine, please email acuyogamama@hotmail.com. 


Tuesday, July 5, 2016

Office Yoga: 5 Yoga Stretches that Help You Feel Better at Your Desk

By Janine L. Agoglia

Technology. It is great for the mind, but horrible for the body. When you spend 8 hours (or more) at a desk, staring at and typing on a computer, your body starts to fall apart: Neck pain, back pain, jaw pain, wrist pain, they are all par for the course when you have a desk job.

Many people claim that they don't have time for yoga, even though they know that it will help their body and mind feel better. Luckily, yoga is very adaptable. There are many poses that can be done while sitting to stretch out the neck, shoulders and back so that your computer doesn't have to be your body's enemy.

As the saying goes, "An ounce of prevention is worth a pound of cure." Proper posture is essential to minimizing the effects of desk work on your body. Ideally your computer station should be set up with your screen at eye level and your keyboard at or slightly below elbow level. Your chair should encourage you to sit vertically, on your sit bones, with your feet comfortably on the floor, placing your knees slightly lower than your hips. Taking short breaks every hour can help you reconnect with your vertical posture while still allowing you to get work done. Those little breaks are a great time for some Office Yoga!

1. Half neck rolls: These are great for relieving neck and upper back tension that is common with
computer work. Simple neck rolls can be done in your chair with your feet on the floor. Sit up straight. Inhale, and while you exhale drop your chin toward your chest. Take 3-5 breaths letting your head and neck relax. Next, roll your head to the right until your right ear is aiming toward your right shoulder and your left ear is aiming toward the ceiling. Take 3-5 breaths here then roll back through center and repeat to the left. Once you've stayed on the left for 3-5 breaths, roll back and forth from side to side, letting your head swing like a pendulum. Never drop your head straight back which can cause compression in your cervical vertebrae.


  • Variation #1: While your head is to the right side, on an exhale, rotate your chin toward your right collar bone and then on your next exhale, up toward the ceiling. You can hold each position for about 3 breaths as well. Repeat to the left.
  • Variation #2: Before starting the half neck rolls, cross your right arm over your left arm as close to the elbows as you can get. Try to reach each hand to the opposite shoulder (right hand to left shoulder, left hand to right shoulder). Make sure to press your shoulders downward. Then do the half neck rolls as described above. Then cross your left arm over your right arm as close to the elbows as possible, grabbing your opposite shoulders and repeat the half neck rolls.

General Guidelines: Choose a different variation each time you stretch to change up the movements you offer your body. Be gentle with yourself. This should feel good, not strained. If your neck muscles start to feel strained, stop and do less the next time. Listen to your body, it will tell you when you've had enough.

2. Seated Twist: This pose can relieve your lower back tension. Sit toward the front of your chair so that your feet can be comfortably on the floor. Keeping your spine straight and vertical, turn your rib cage to the right so that your left ribs are moving forward and your right ribs are moving backward; your pelvis should stay facing forward. Gently turn your face and gaze to the right, keeping your head vertical as well. Feel free to rest your left arm on your right side arm-rest, if your chair has one. If not, you can rest your left hand on your right knee. Hold for 3-5 breaths, then repeat to the left.

General Guidelines: Make sure you are not pushing or forcing yourself into the twist using your arms, the movement comes from the core of your body (obliques, quadratus lumborum). This ensures safe twisting. If you have moderate to severe scoliosis or any disc problems, consult your doctor before twisting.

3. Hamstring Stretch: One problem with sitting for long periods is that your hamstrings (muscles behind your thighs) are in a constant state of contraction. Tight hamstrings can lead to lower back problems (read Common Causes of Lower Back Pain and their Yoga Solutions). By working to release the hamstrings it can relieve the tension in your lower back. Sit toward the front of your chair with your left foot flat on the floor. Extend your right leg forward with the heel resting on the floor (feel free to take your shoes off for this one if you like). Sitting vertically might already create a stretch in your right leg. If so, just stay and breathe, 3-5 breaths. If you don't yet feel a stretch, keeping your spine straight, tip your pelvis forward so that your navel is moving closer to your lap. Move until you feel a stretch then stay 3-5 breaths and repeat on the other side.

General Guidelines: Make sure you are not rounding your spine, the stretch comes from the movement of the pelvis, not from your head dropping forward. When you round your spine, you lose the connection to your hamstrings and you are only stretching your lower back.

4. Seated Pigeon pose: Sit with your left foot flat on the floor and cross your right ankle over your left knee. If you can't get the ankle on the knee, straighten your left leg until you can, then work toward bringing the left foot closer to you until the foot is under the knee (it may not get there right away). Sit up as straight as possible while letting your right knee drop toward the floor. If you are already feeling a stretch in the right hip/glutes, stay just as you are and take 3-5 slow breaths. If you are not yet feeling a stretch, keeping your spine straight, tip your pelvis forward, reaching your navel toward your right shin. Stop when if feels like a significant enough stretch. Hold 3-5 slow breaths then repeat to the other side.

General Guidelines: Make sure to keep the top ankle flexed (rather than relaxing the foot) so as to stabilize the ankle, thus putting all of the stretch into your hip where you need it. If you have had a hip replacement, keep the bottom leg a little straighter so there is less hip flexion; you may also need to keep your top knee slightly elevated by supporting it with your hands. Try not to force the stretch, move into it slowly and comfortably.

5. Upper back bend/chest opener: Make sure you are sitting in a
lower-backed chair. If you don't have one, go to Variation #1. Sit all the way back on your chair so that your back is pressed against the back of your chair. As you inhale, sit up even taller. As you exhale, lean back over the top of your chair back creating a small back bend over the back of your chair. The base of your skull should rest on the back of your chair. Reach your arms out to the sides with the palms facing the ceiling. Take 3-5 breaths, trying to expand your rib cage and chest with air, increasing your lung capacity with every inhale and emptying completely with every exhale.

  • Variation #1: Sit toward the front of your chair and interlace your fingers behind your lower back. Try to bring your palms together so they touch (you might need to bend your elbows). As you inhale, squeeze your shoulder blades together and imagine that your collar bones are spreading apart. As you exhale reach your knuckles away from your hips. Stay 3-5 breaths, then repeat with the other set of fingers on top (if your left thumb is on top, shift all of your fingers over by one until your right thumb is on top). Variation #1a: If you can't bring your hands together, grab either side of your chair back and press your chest forward while squeezing your shoulder blades together. 


  • Variation #2: Start with Variation # 1. Inhale, then as you exhale, fold forward over your lap, reaching your knuckles toward the ceiling. This will stretch the chest, shoulders and lower back. Hold 3-5 breaths, then repeat with the other fingers on top. Variation #2a: If you were grabbing the back of your chair, slide your hands down to the arms as you fold forward, still moving your shoulder blades toward each other. 
General Guidelines: Make sure not to let your wrists pop outward. Try to make a combined fist with your two hands. Squeeze from your Rhomboids (muscles between your shoulder blades) to get the most stretch and opening in your chest and shoulders.


Once you've finished your Office yoga practice, end with sitting upright in your chair, feet planted on the floor and close your eyes. Place your hands on your lower abdomen and take 5 slow belly breaths, expanding the belly as you inhale and letting it gently contract as you exhale. Breathe slowly and evenly, in and out. Open your eyes and go back to work feeling more energized and relaxed.


Janine L. Agoglia has been teaching Vinyasa yoga since 1998. Her yoga journey started in 1995 with Iyengar Yoga and she discovered Vinyasa yoga in 1997. The combination of breath with proper body alignment is what fuels Janine's practice and the classes that she teaches. She believes that yoga should be safe as well as challenging, creative and fun. She always emphasizes proper alignment within the flow, as well as focus, breath and humor to help students find the balance between strength and ease. Deepening one’s physical awareness helps one strengthen his/her spiritual awareness and mind-body connection. Janine loves being able to help people deepen their own practices, finding yoga in everyday life, on and off the mat. Her DVD, “Vinyasa Yoga for Regular People” is available for purchase at the front desk at Lumina Mind Body Studios in Wayland, MA.

In addition to being the Director of Yoga and teaching yoga classes at Lumina Mind Body Studios, Janine is also a Licensed Acupuncturist and Chinese Herbalist who practices at Integrative Therapeutics in Natick, MA.

To contact Janine, please email acuyogamama@hotmail.com.


Thursday, June 2, 2016

What is the Difference between Cobra (Bhujangasana) and Upward Facing Dog (Urdva Mukha Svanasana)?

By Janine L. Agoglia

Even though I teach Vinyasa Yoga, I have an Iyengar yoga background, so I'm a bit of a stickler for proper alignment. Most times in Vinyasa classes the focus is on the flow and not on proper alignment in the poses themselves. People can often get injured when they don't fully understand a pose, physically, yet try to copy the teacher or other students; when you repeat a pose using poor alignmnent it never ends well. Understanding the nature of each pose will allow you to move your body safely, simultaneously strengthening the body and promoting ease in the mind.

When it comes to Cobra and Upward Facing Dog, being as they are back bending poses, it is important to understand the overall movement of these poses so that you do not strain or damage your lower back. Anyone with lower back issues should focus on Cobra and not attempt Upward Facing Dog until you have a strong asana practice.

My goal with this post is to help you understand each of these two poses so that you can choose which one (or both) is best for your body, while practicing them with strength and integrity.

Cobra / Bhujangasana

Start lying face down on your mat. Point/extend your toes behind you with your feet hip distance apart (typically about 4" or so). Press the tops of your feet into the mat so that your knees hover off the mat and your quadriceps engage. Engage your buttocks and reach your tailbone toward the floor. Bring your hands to the sides of your lower ribs so that they are directly under your elbows (not under your shoulders); your forearms should be perpendicular to the floor. Without using your arms, reach the top of your head forward and lift your chest away from the floor. To deepen, press your hands backward and downward into the mat and draw your chest even further forward, as if you could drag yourself through your arms. Try to create more space between your rib cage and your pelvis, while lengthening the lower back.


Common misalignments :

1. Instead of pulling forward, you press straight upward, or even backward, while keeping your pelvis on the floor. Not only does this feel terrible, it can cause damage or injury to your lower back. Cobra is not about how high you lift your chest off the ground, it is about finding the back bend in your upper back (lower back stays lengthened out on the floor), using the muscles along the spine, not your arms.

2. Shrugging your shoulders. If you are pushing yourself off the ground, chances are you are wearing your shoulders as earrings. Instead, press your shoulder blades toward your waist, engaging the latissimus dorsi. This gives you more power to move your chest forward instead of upward. It is also important when moving into Upward Facing Dog.

3. Straightening your arms. In Cobra, arms should be bent, not straight. Even the most flexible yogi keeps the elbows bent, even if just slightly, because this allows more opening across the chest.

4. Reaching forward with your chin. Try to keep the head in line with the spine, so as the chest leaves the floor, the head is coming along for the ride, rather than doing the lifting. Try to lengthen forward through the back of your throat rather than your chin; the bigger the back bend the higher your gaze goes, but to start, most likely you will be looking at the floor a little in front of you.

Upward Facing Dog / Urdva Mukha Svanasana

Start in Cobra. Press the tops of your feet into the mat and straighten your arms, lifting your legs and pelvis off the mat. Lift your thighs toward the ceiling, while pressing your tailbone toward the floor. Press your shoulder blades downward through your palms while moving your chest both forward and upward. This is also and upper back back bend; your lower back should be long, stabilizing it by using the lower abdominal muscles (transversus abdominis).


Common misalignments:

1. Leaving your hips and legs on the floor. The legs are a very active part of this pose. The only parts of your body that should be touching the floor are your hands and feet. If you don't actively lift the legs upward, chances are you are bending into your lower back, which will cause pain and eventually injury.

2. Shrugging your shoulders. Chances are if you are not using your legs, you are also not using your upper back muscles to press into the floor and lift up. Shrugging causes neck and shoulder tension and also leaves you overusing the lower back rather than finding the upper back back bend. You can play a bit by intentionally shrugging and sinking toward the floor, then pressing the shoulders down and lifting back upward, so that you can feel the difference.

3. Collapsing the neck. It feels good to look up in this pose, however, like with Cobra, you want the head in line with the spine. If you chest faces the ceiling, then your gaze can too, but not by dropping the head toward your upper back. Like Cobra, try to lengthen the back of your throat. At the very top of your spine while keeping the neck long, you can tilt the chin upward slightly. You should be able to breathe easily and speak with a normal (not constrained) voice. If you can't, drop your chin back down.

Similarities and Differences

I like to think about Upward Facing Dog as "Cobra Lifted Off the Floor". They both employ strong, active legs and an upper-back back bend. They both press the shoulder blades toward the waist and reach the tailbone toward the floor. With Cobra, the majority of the body is on the floor with just the chest lifted, elbows are bent. With Upward Facing Dog, the whole body is lifted off the floor with only the hands and tops of the feet touching, arms are straight.

I hope that clears up any questions you may have about these poses. In class, feel free to try either or both of these poses, as long as you are clear about which one you are doing. No hybrids please!

Janine L. Agoglia has been teaching Vinyasa yoga since 1998. Her yoga journey started in 1995 with Iyengar Yoga and she discovered Vinyasa yoga in 1997. The combination of breath with proper body alignment is what fuels Janine's practice and the classes that she teaches. She believes that yoga should be safe as well as challenging, creative and fun. She always emphasizes proper alignment within the flow, as well as focus, breath and humor to help students find the balance between strength and ease. Deepening one’s physical awareness helps one strengthen his/her spiritual awareness and mind-body connection. Janine loves being able to help people deepen their own practices, finding yoga in everyday life, on and off the mat. Her DVD, “Vinyasa Yoga for Regular People” is available for purchase at the front desk at Lumina Mind Body Studios in Wayland, MA.

In addition to being the Co-Director of Yoga and teaching yoga classes at Lumina Mind Body Studios, Janine is also a Licensed Acupuncturist and Chinese Herbalist who practices at Integrative Therapeutics in Natick, MA.

To contact Janine, please email acuyogamama@hotmail.com or visit her website, www.acuyogamama.com.

Thursday, May 12, 2016

Top 6 Yoga Poses to Improve your Golf Game

By Janine L. Agoglia

Golf is a sport loved by many, but with it can come many physical ailments. The main reason for this is that playing golf requires repetitive movement that always occurs on the same side. Do you "switch hit" when you play? I don't know anyone that does.

Yoga is a great complement to any sport, including golf, because it uses every muscle and moves the body through every range of motion. There are a number of poses that can help you with your golf swing, both with range of motion as well as with power. Yoga can create strength while releasing the tension that impedes your swing, thereby increasing your ability to hit the tiny ball into the tiny hole. Yoga also helps improve focus and concentration, both of which are essential, not just for golf, but for life.

Before trying these poses for the first time, please read this blog post on how to keep yourself safe, listen to what your body is telling you, and know your limits. Yoga is not about going the farthest or pushing yourself the hardest, you want to feel good so that you enhance the quality of your mental and physical health, thereby improving your ability to play the game you love.

Top 6 Poses to Improve your Golf Game

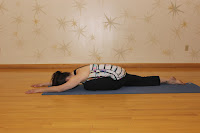
1. Reclining Spinal Twist-- Improves range of motion and strength for your swing
Start by lying down on your back with your knees pulled into your
chest. Open your arms out to the sides, like the letter "T" and let your knees drop to your left. If you feel too much pull on your back, place a rolled up towel, pillow or yoga block either under both knees so there is less twist, or between your knees which can help keep your hips properly aligned. Hold in the twist for 5 deep, slow breaths then repeat to the other side. Once you have done both sides, it can feel good to rock the knees from side to side, inhaling to bring your knees back over your chest, then exhaling into the twist, going back and forth an equal number of times. Try to use your abdominal muscles to move the legs from side to side as a gentle way to strengthen your core

2. Locust--Strengthens your back and releases tension in the chest and shoulders
Lie face down with your arms at your sides, palms facing the ceiling, forehead on the floor. Bring

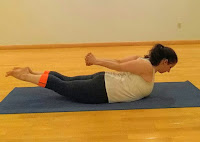
your hands behind you and interlace your fingers at your lower back. Try to make one fist with two hands (you can bend your elbows to bring your palms together and then work toward straightening your arms). Squeeze your shoulder blades together and reach your knuckles toward your feet. As you inhale, lift your chest (head comes along for the ride) and legs off the floor. Be sure not to reach the chin forward, try to keep the back of your throat reaching forward. Hold for 3-5 breaths then release, turning your head to one side, unlacing the fingers and letting the shoulders round toward the floor. After resting for 3-5 breaths, bring your forehead back to the floor and interlace your fingers at your lower back with the other fingers on top (if your right thumb is on top, shift all of the finger over by one so that the left finger is on top, still pressing the palms together). Lift up again, holding 3-5 breaths, then release, this time turning your head to the other side.

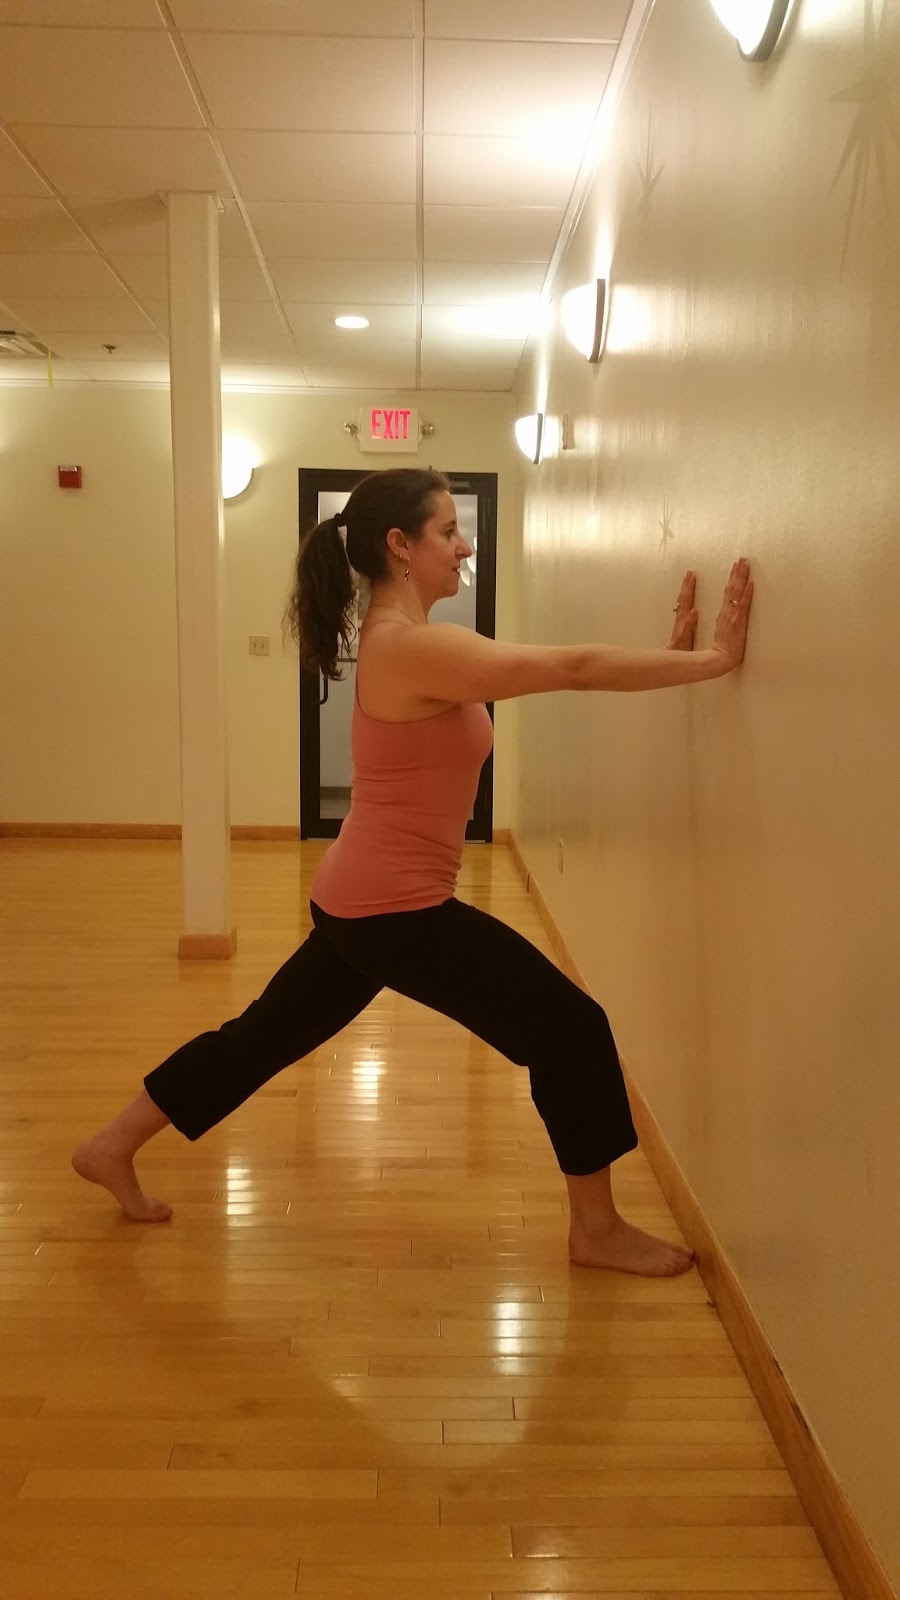
3. Low Lunge--Improves hip flexor mobility
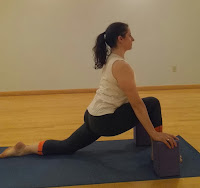
Kneel on the floor (feel free to place some sort of padding under your knee, like a mat or a blanket) and step your right foot forward. Make sure your right knee is directly over your right ankle so that your shin is perpendicular to the floor; that might mean adjusting the foot slightly. Your hands can stay on the floor or blocks next to your right foot, or they can come to your right knee or they can reach up over your head. Make sure only to go as far into this pose as feels good and safe. Your hips should be sinking forward toward the floor, your tailbone dropping downward also toward the floor. The stretch should be felt in the front of the left hip. If you don't feel a stretch, gently press your hips forward a little more. Hold 5-8 breaths, then repeat to the other side.

4. Downward Dog--Strengthens the shoulders, core and legs while stretching the hamstrings, shoulders and back
For a more detailed description of Downward Dog, click here; for the basics, read on. Start on your hands and knees, spreading the fingers while pressing the whole palm into the floor. Tuck your toes under and lift your hips so that you are in an upside down "V" shape. Your heels may or may not be able to touch the floor and that is fine. Try to spread your shoulders apart, widening the upper back as much as possible. If your lower back is rounding so that your tailbone is aiming for the floor, bend your knees slightly (or a lot) and try to aim your tailbone for the ceiling behind you; this should flatten your spine. Keep the spine flat and work toward straightening your legs. If your hamstrings are tight, it may not be possible to keep the back flat and get the legs straight, so work with your knees bent, moving toward straight as your hamstrings lengthen and release.

5. Pigeon/Reclining Pigeon--Opens the hips, releases the glutes
For a more detailed description of both Pigeon and Reclining Pigeon, click here; for the basics, read on. For Pigeon, come onto your hands and knees and bring your right knee forward toward your right wrist. Slide your right shin slightly forward as you sink your hips toward the floor; it is not important for your hips to touch the floor, it is more important for both hips to face forward. Place a rolled towel, blanket or block under your right hip for extra support if you need. Extend your left leg behind your left hip. Fold forward over your right knee, letting your head rest on the floor, a rolled towel or a block; this support for the head allows the neck to relax completely. Stay for 5-8 breaths then repeat to the other side.
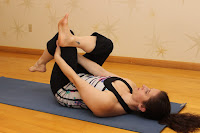
If this bothers your knees or other joints, Reclining Pigeon is a better option for you. Lie on your back with your left knee bent, foot flat on the floor. Cross your right ankle over your left knee (making an upside down #4 with your legs) and bring your left knee toward your left shoulder. Reach your right arm through the opening made by your right leg and interlace your fingers behind your left thigh. Use arm strength to bring your left knee closer to your left shoulder, while gently pressing your right elbow into your right thigh. Lengthen the tailbone toward the floor. Stay for 5-8 breaths then repeat to the other side.

6. Tree pose--Improves balance and mental focus

Stand with your feet 3-4" apart and parallel so that the heel is directly behind the 2nd and 3rd toe
on each foot. Stack your ankles over your heels, your knees over your ankles, your hips over your knees, your shoulders over your hips and your head over your shoulders. In doing this, you want to feel the fronts of your thighs lifting upward, your lower abdominal muscles lifting upward and your buttocks engaged (this is Mountain Pose, for more on Mountain, click here). Keep that alignment and shift to your right so that 80% of your weight is on your right foot, allowing your left heel to lift off the floor. You can stay there, or float your left knee toward your chest. You can stay there or bring your left foot to your inner right leg, as high or low as is comfortable, just make sure not to press into your knee joint. Squeeze your left foot and right leg together equally. Your hands can come to your hips or come together in front of your heart. Keep your eyes open so that you can see something with your eyes; it is possible to balance with your eyes closed but it is significantly more challenging. Having some sort of object in front of you on which to focus your eyes makes balance easier. Stand on one leg for as long as you can, then switch sides. Over time, it will be easier and easier to balance; try to be patient with yourself and give yourself permission to fall over. Yelling at yourself for losing your balance serves no purpose, try to use kind self-talk only. If you can be kind to yourself while balancing on one leg, it will be easier to be more forgiving of yourself when you miss on the green. At least half of playing golf is mental; if you can stay calm and relaxed while playing your results will be better. Tree pose is a great place to practice humor, humility and kindness toward yourself.


Regular yoga practice can improve your control over your body and help you feel good physically and mentally.

Related posts:

Improving your Golf Game with Acupuncture

How to Know Your Limits in a Yoga Class


Downward Dog: Tips to Help You Love this Pose

Kapotasana or Pigeon Pose: How to Safely Open the Hips

Reducing Anxiety by Becoming a Mountain


Janine L. Agoglia has been teaching Vinyasa yoga since 1998. Her yoga journey started in 1995 with Iyengar Yoga and she discovered Vinyasa yoga in 1997. The combination of breath with proper body alignment is what fuels Janine's practice and the classes that she teaches. She believes that yoga should be safe as well as challenging, creative and fun. She always emphasizes proper alignment within the flow, as well as focus, breath and humor to help students find the balance between strength and ease. Deepening one’s physical awareness helps one strengthen his/her spiritual awareness and mind-body connection. Janine loves being able to help people deepen their own practices, finding yoga in everyday life, on and off the mat. Her DVD, “Vinyasa Yoga for Regular People” is available for purchase at the front desk at Lumina Mind Body Studios in Wayland, MA.

In addition to being the Co-Director of Yoga and teaching yoga classes at Lumina Mind Body Studios, Janine is also a Licensed Acupuncturist and Chinese Herbalist who practices at Integrative Therapeutics in Natick, MA.

To contact Janine, please email acuyogamama@hotmail.com or visit her websitewww.acuyogamama.com.


Tuesday, April 26, 2016

Kapotasana or Pigeon Pose: How to Safely Open the Hips

By Janine L. Agoglia

Pigeon Pose, or Kapotasana is a quintessential hip opener common in many yoga practices. For people who run, climb stairs or really do any type of physical exercise, the Glutes, or what we call the "hips" in yoga, can get very tight. This can lead to dysfunction in other parts of the body (knees, lower back, hip joint). By "Opening the Hips" you can release the tension and feel more comfortable in your daily life, as well as prevent compensation injuries from occurring.

For people with knee or hip problems (joint replacements, labrum tears, meniscus tears, etc.) I don't recommend Pigeon for you, however, there are other variations that can accommodate any body, and I will describe them in a bit.

Pigeon Pose (Kapotasana):

Come onto your mat and bring your right knee forward, placing it on the mat in front of your right hip, slightly toward your right hand. Aim both hip bones forward equally toward the wall in front of you ("squareing" the hips). Your left leg should extend directly behind your left hip with the knee facing the floor and the ankle extended. Feel free to place a blanket or pad under your left knee for some cushioning if you need. Take a deep breath in, and as you exhale, lengthen your spine forward to fold over your right thigh. Let your head rest on the floor in front of you and lengthen your arms forward. Stay 5-10 breaths then repeat with the left leg forward.

Key points for Pigeon:
  • Hips are squared forward
  • The hips do no not need to touch the floor
  • The head should rest on something
  • Your front knee should be aligned in front of your hip
  • Your shoulders should be relaxed and not holding you up
  • You must breathe


Hips are squared forward. This means that both hips face straight ahead, rather than aiming on a diagonal. When you fold forward over your front knee, both hips should be aiming for and be equidistant from the floor.


Your hips do not need to touch the floor. The tendency is to place the hip of the leg that is forward on the floor, but this actually reduces the hip stretch. Eventually (perhaps) both hips will reach the floor at the same time, but that is not the goal. The goal is to feel an opening in the hip of the leg that is forward. If it is uncomfortable to have the hips off the floor, place a block, blanket or bolster under that hip of the forward leg. Make sure to bring the support up to meet the hip, not the hip down onto the support, as this will throw off your alignment by "unsquaring" your hips.

Your head should rest on something. If your head doesn't reach the floor, you can rest it on a block or on your hands. When you relax your neck, your jaw can relax. When the jaw relaxes, it allows the hips to relax, which is what we are focusing on in this pose. Also, when the head can rest on something it allows you extend the arms forward and relax the shoulders.

Your front knee should be aligned in front of your hip. If your right knee is forward, place it in front of your right hip so that the thigh is parallel to the right side of your mat. You can increase the intensity of the hip stretch by moving your right shin forward toward being parallel to the front edge of your mat, or decrease the intensity by bringing your right foot back toward your left hip. The intensity should never by higher than a 7 on a scale of 1-10.


Your shoulders should be relaxed, not holding you up. Try not to rest on your elbows as this causes the shoulders to scrunch and creates tension in the neck. Try to extend the arms in front of you so that the shoulders and neck can relax.

You must breathe. As you exhale, there is a natural physiological response of relaxation. The deeper you inhale, the longer you can exhale and the more time you have to relax the hips. The best way to gain flexibility is to relax into a stretch, not to force it. By breathing deeply your hips will open gently as they are ready.

As I mentioned before, Pigeon is not for everyone. If you have knee or hip joint problems, there is a great alternate pose called Reclining Pigeon Pose.

Reclining Pigeon (Supta Kapotasana):

Lie on your back with your left foot flat on the floor and your left knee bent.
Take your right ankle and place it over your left knee. Bring your
left knee toward your left shoulder keeping your right foot flexed. Reach your right hand through the hole made by your right leg and hold your left thigh with both hands. Use arm strength to bring your left knee toward your left shoulder while lengthening your tailbone toward the floor and keeping your hips and legs relaxed. To deepen the stretch, use your right elbow to gently press your right thigh forward. Listen to your body and don't force anything. Again, the intensity should never be higher than a 7 on a scale of 1-10. To read more about knowing your limits in a yoga class, click here. Stay 5-10 breaths then repeat on the other side.

Janine L. Agoglia has been teaching Vinyasa yoga since 1998. Her yoga journey started in 1995 with Iyengar Yoga and she discovered Vinyasa yoga in 1997. The combination of breath with proper body alignment is what fuels Janine's practice and the classes that she teaches. She believes that yoga should be safe as well as challenging, creative and fun. She always emphasizes proper alignment within the flow, as well as focus, breath and humor to help students find the balance between strength and ease. Deepening one’s physical awareness helps one strengthen his/her spiritual awareness and mind-body connection. Janine loves being able to help people deepen their own practices, finding yoga in everyday life, on and off the mat. Her DVD, “Vinyasa Yoga for Regular People” is available for purchase at the front desk at Lumina Mind Body Studios in Wayland, MA.

In addition to being the Co-Director of Yoga and teaching yoga classes at Lumina Mind Body Studios, Janine is also a Licensed Acupuncturist and Chinese Herbalist who practices at Integrative Therapeutics in Natick, MA.

To contact Janine, please email acuyogamama@hotmail.com or visit her website, www.acuyogamama.com.


Sunday, April 17, 2016

To Roll or Not To Roll: Foam Rolling, Does it Help?

By Teresa Newton-Moineau

Have you ever seen those long black or white cylinders in the gym and weren't sure what they were? They are called Foam Rollers and should be an integral part of your exercise routine.

Foam rollers are important for recovery and injury prevention. They are most known and used by athletes but should be used by anyone who works out.  Foam rollers create a Self-Myofascial Release (SMR), which relaxes contracted muscles and fascia (a layer of connective tissue that surrounds the muscles of the body) through the force of the body against the foam roller. It is the next best thing to having a massage!

The benefits from using a foam roller include:
~Increased blood flow through the body
~Increase in circulation of blood and lymph, which promote healing
~Increased range of motion
~Better movement
~Known to help cellulite

There are various kinds of rollers, ranging from soft to hard.  You want to start off with one that is appropriate for your body so you will stick with it. If you don't feel anything, it is too soft; if you feel beaten up and bruised, it is too hard. The sensation can be strong while you are on the roller, but you should feel good after using it. You can roll almost every place on your body, with the exception of your stomach/chest area & on any organs. All of your muscles are fair game. However, if you have protruding varicose veins, please roll around them, not on them. Finally it is important to stay hydrated, not just for health, but because foam rolling will dehydrate you. It is a workout in and of itself!

If you want to see what the foam roller is all about, come try a class!  I teach Stretch, Roll & Sing every Saturday at 10:30am at Lumina Mind Body Studios in Wayland.


For over 35 years, Teresa Newton-Moineau has been teaching group exercise in the Metro-West area of Boston. With her understanding and passion for fitness, Teresa became a certified personal trainer in 1990, working with individuals for personal fitness success, as well as becoming a children's fitness specialist and conditioning coach for the local High School football team.

In 1996 Teresa became the Group Exercise Coordinator for the Longfellow Club in Wayland, MA. Teresa's legendary classes are held daily at the Longfellow Club and encompass Keizer Indoor Cycling, Step Aerobics, Muscle Conditioning, Pilates and Children's Fitness classes. Teresa is also certified in Nutrition, and is the creator of her  "Quick Fix" and "Stretch, Roll and Sing" classes, held exclusively at the Longfellow Club.

Saturday, April 9, 2016

Yoga Playground: An Exploration in the Practice of Yoga

By Erin Reilly

"I can't go to yoga class, I don't know how to do yoga!"
"I wish I felt comfortable asking a question in class."
"I'm curious about meditation and breathing exercises."
"I'm scared to go upside down."
"I've always wondered how to do ___________ pose."

Can you identify with any of these? The format of a regular yoga class, with its flowing series of poses like a moving meditation, can't often accommodate questions or deeply explore a pose. Though a flowing class can leave you in a deeply blissful state, there might be times when you leave feeling puzzled or questioning. Maybe you haven't been brave enough to even take a class!

Our new Lumina Natick class, Yoga Playground, which meets Mondays 11a-12p, offers the chance to learn yoga techniques within a class setting. It is appropriate for beginners through advanced students, since even the most advanced yogi can keep learning. It is often the most advanced students that have the most questions!

Would you ever say you can't take piano lessons because you don't know how to play the piano? Of course not; same with yoga-- you learn as you go! During class your teacher works with you on techniques, then you practice them. You can continue practicing your "yoga lessons" at home!

Each week at Yoga Playground, we will warm up with some flowing, breath-linked moves, then have fun exploring different areas of yoga, with time for demonstrations, questions and practice. We will always end with some delicious stretching and a wonderful relaxation.

Possible Topics (of course your suggestions are always welcome!):

  • Balance
  • Back bending
  • Arm balances
  • Building strength
  • Meditation
  • Yoga for Mood regulation
  • Breathing exercises
  • Going upside down (inversions)

The more you come, the more you will learn and before you know it, you will have a solid yoga practice!

Learning something new, especially something physical, is so good for your brain! Bring your open mind, your playful spirit, and your body, no matter what state it is in. 

Come play at the Yoga Playground!

Erin likes to combine the best of all that different yoga styles have to offer, into a class of creative flow, safe alignment, anatomical explanations and awareness of the mental benefits of yoga.

Erin began her yoga journey in 2001, right here at the Natick Longfellow Sports Club, taking classes with Janine Agoglia 3 times a week. Erin's background as a gymnast and hurdler prepared her well for yoga. Since then she has trained with many of the world's most famous yoga teachers (none better than Janine!), at the Kripalu Center in the Berkshires and in Boston.

Erin also teaches yoga and leads retreats at her waterfront home studio in Wellesley, Personal DAY Yoga. For more information about Erin and her classes, go to  www.personalday.net. 


Monday, March 28, 2016

Common Causes of Lower Back Pain and their Yoga Solutions

By Janine L. Agoglia

Back pain is very common. There is a statistic that says 80% of adults will experience back pain at some point in their lifetime. The most common cause of back pain comes down to one thing: posture. When your mother told you to stand up straight, she was right: as gravity pulls on our bodies day after day, hour after hour, if it is improperly aligned (like when you slouch), your muscles strain to move you toward vertical. Small stabilizer muscles overwork and eventually start to hurt. Long term incorrect posture can lead to more serious issues, like disc problems and debilitating pain. Before starting any exercise plan and to fully understand the nature of your back pain, it is important to get a full evaluation from a medical professional. To understand how posture affects pain, let's look at the lower back and pelvis.

Common causes of lower back pain can be tight hamstrings, tight hip flexors, weak core or all of the above. When you spend much of your time sitting, at a desk or in a car, your hip flexors and hamstrings are in a constant state of contraction. The longer you sit, the more likely it is for your muscles to tire and you start to slouch. Slouching causes the tailbone to aim forward, which shortens the hamstrings even more, as they attach to the base of the pelvis at the sit bones (ischial tuberosities). Long term tightening of the hamstrings and hip flexors puts strain on the lower back, which then has to compensate when you move. When the hamstrings pull on the sit bones, it brings the lower back out of the natural lumbar curve, causing a flattening of the lower back which weakens the muscles and they lose stability. Tight hip flexors cause the tailbone to aim backward which causes a deepening of the lumbar curve which can cause compression in the lumbar vertebrae and lead to lower back pain and disc problems. The Psoas muscles attach to the front lumbar vertibrae and will then pull and cause pain and misalignment of the lower back. Unfortunately having both tight hamstrings and tight hip flexors doesn't cause a net zero cancellation, but rather causes more problems. When you have a weak core (which includes the hip flexors, abdominals, pelvic floor and lower back muscles), the lower back is overused and can often strain. Strengthening the core can make a huge difference in your back pain.

So what to do? Step one is to work on your posture. How you use your body for the majority of your day matters more than just doing a few poses. If you can work to prevent the problem in the first place, all the better. Think about stacking your joints whether you are sitting or standing. The more awareness you have surrounding how you sit and stand plays a huge part in how your body feels and functions.

In terms of addressing the hamstrings and hip flexors, there is a lot that can be done to improve how they affect the pelvis, and therefore your lower back. It is important to understand where these muscles attach, so that you are better able to stretch them and get the pressure off of your lower back.

The Hamstring muscle group is made up of 3 muscles that attach at the sit bone and the lower leg so that your knee can bend. Contracting the hamstrings bends the knee, they stretch and elongate when the leg is straightened; the tighter this muscle group is, the harder it is to straighten the leg. When hamstrings are chronically tight, it is common for the lower back to stretch instead, or take the brunt of the force that belongs in the legs. For example, when you fold forward over your legs, ideally you are moving the sit bones away from the heels to stretch the hamstrings, but if they are tight, the lower back may round (keeping the sit bones closer to the heels), so that lower back takes the brunt of the stretch. You feel like you are folding forward, but you are not targeting the muscles that really need to stretch. Over time, the lower back gets stretched out, but not the hamstrings so they pull on the sit bones which throws off your posture and you end up with lower back pain.


The hip flexors include the Psoas and Iliacus muscles which together are the Iliopsoas group. These muscles attach to the vertibrae and Iliac bones (of the pelvis) and connect down to the Femur (upper leg). When they contract they bring the thigh toward the chest (flexing the hip) and when the hip extends, they lengthen. When these are tight, it makes it hard to bring the pelvis to a vertical alignment when you are standing. If your core is also weak it may create a deeper lordosis in the lower back (an increasing of the natural lumbar curve) which can compress the spine and vertebral discs and cause pain.


Working on the hamstrings and hip flexors should be a daily or every other day endeavor if you want to make a meaningful difference. As I wrote earlier, you are trying to undo posture habits that occur all day long every day, so every little bit helps. When you are stretching, it is important not to over stretch or force your body to open when it isn't ready. On a scale of 1-10, where 10 is excruciating pain and 1 is nothing, the stretch should create a sensation between 3-7. Make sure you are breathing deeply and slowly so that the opening is gradual and with ease. Forcing a stretch where you are fighting yourself will only lead to injury. The deeper you breathe, the more you relax and the easier it is for the body to open.

When stretching the hamstrings it is important to focus on moving the sit bones away from the heels; at first the legs might not straighten all the way and that is fine. Place your left knee on the floor under your left hip and extend your right leg in front of you, foot flexed with the toes aiming for the ceiling. If getting down on the floor is challenging, you can stay standing and just place your foot on a step or stool in front of you. Have a chair or wall handy to rest your hands upon. With your right leg extended, tip your pelvis forward so that the sit bones move away from your right heel. Place your hands on the floor or blocks on either side of your right leg (or on a chair or wall if you are standing). Stay for 5-10 deep, slow breaths, then repeat to the other side.


When stretching the hip flexors, start in the same position on your left knee with your right leg extended. Bend your right knee until the knee is over your right ankle and place your hands on the floor or on blocks on either side of your right foot. You can stay there if you are already feeling a stretch in front of your left hip, or you can place your hands on your right knee, bringing yourself more vertical, or raise your arms over your head if that feels comfortable. If the floor is not available stand facing a wall with your right foot at the wall and your left foot about 2-3 feet behind your left hip. Stand on the ball of your left foot, place your hands on the wall and bend your right knee over your right ankle, keeping the pelvis as vertical as possible. If you don't feel a stretch, step your left foot further back. Whichever variation you choose, stay for 5-10 deep, slow breaths then repeat to the other side.

The best change is gradual. You can't undo years of misalignment in a week. Give your body time to change by stretching daily and being patient and compassionate with yourself.

Janine L. Agoglia has been teaching Vinyasa yoga since 1998. Her yoga journey started in 1995 with Iyengar Yoga and she discovered Vinyasa yoga in 1997. The combination of breath with proper body alignment is what fuels Janine's practice and the classes that she teaches. She believes that yoga should be safe as well as challenging, creative and fun. She always emphasizes proper alignment within the flow, as well as focus, breath and humor to help students find the balance between strength and ease. Deepening one’s physical awareness helps one strengthen his/her spiritual awareness and mind-body connection. Janine loves being able to help people deepen their own practices, finding yoga in everyday life on and off the mat. Her DVD, “Vinyasa Yoga for Regular People” is available for purchase at the front desk at Lumina Mind Body Studios in Wayland, MA.

In addition to being the Director of Yoga and teaching yoga classes at Lumina Mind Body Studios, and on Facebook,  Janine is also a Licensed Acupuncturist and Chinese Herbalist who practices at Integrative Therapeutics in Natick, MA.